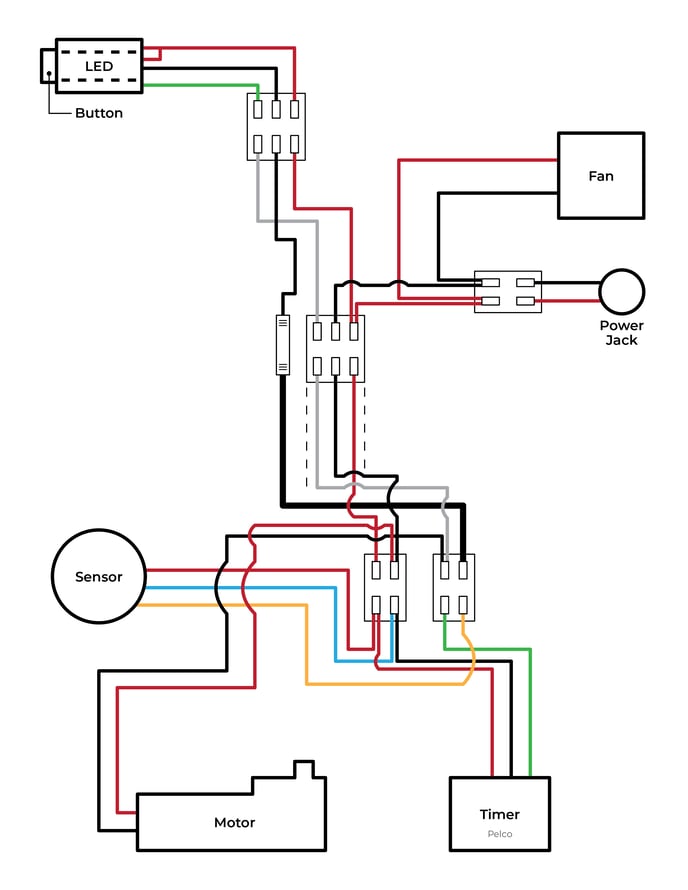
This version of the harness includes an inline PTC fuse wired on the red power lead and a three-wire timer labeled as the “old timer” in the wiring diagram.
Wire Diagram 2-8-22
Why You Might Be Here
-
Your motor has stopped running and there are no visible obstructions
-
You’re seeing intermittent or total failure of the mixing function
-
You’ve confirmed you're using the 2/8/22 harness (check for the inline fuse on the red wire and a three-wire timer)

Step 1: Identify Your Harness and Components
Refer to the diagram you have or check the following on your actual wiring:
-
Red Wire: Runs through a small cylindrical PTC fuse before entering the lower 2-pin connector
-
Three-Wire Timer: Connected to motor and fan controls; no direct ground wire
-
Wire Colors:
-
Red → Power input (fused)
-
Black → Common ground
-
White → Sensor/fan signal line
-
Step 2: Remove the PTC Fuse
Tools Needed:
-
Wire cutters
-
Wire strippers
-
Heat-shrink butt connectors or crimp terminals
-
Electrical tape (optional)
How-To:
-
Power down the unit and disconnect from power.
-
Locate the PTC fuse on the red power wire running to the lower input plug.
-
Cut out the fuse completely.
-
Strip the ends of the red wire on both sides.
-
Reconnect the wire using a secure method (solder and heat shrink, or a crimp connector).
-
Reconnect power and test to see if the motor resumes operation.
This is a solid short-term fix—but the better move is upgrading entirely.
Step 3: Upgrade to the New Timer and Wire Clips
We’ve improved the wiring system since the 2/8/22 harness. The new version uses a four-wire timer, eliminating the need for a PTC fuse and offering more reliable current handling.
Benefits of the Upgrade:
-
No more inline fuse
-
Dedicated ground and fan leads
-
Simplified troubleshooting
-
Improved long-term reliability
Upgrade Instructions:
-
Remove the old 3-wire timer and clips.
-
Install the new 4-wire timer and plug system.
-
Match the new wires based on function and color. Refer to your upgrade kit or follow this breakdown:
Wiring Color Match (New vs. Old):
-
Red (new) → Red (old) – Power input
-
Black (new) → Yellow (old) – Ground (formerly labeled black in the diagram)
-
Green (new) → White (old) – Fan signal
-
Yellow (new) → Optional additional control/sensor (depends on board update)
Always double-check polarity and labeling on the timer module itself before finalizing connections.
Step 4: Final Test and Close-Up
Once your new timer and wiring are in place:
-
Reconnect all plugs
-
Power up the system
-
Run a cycle and confirm motor and fan performance
-
Ensure no excess heat or disconnection at joints
If everything checks out—you’re done. You’ve future-proofed your OGO™ ORIGIN wiring and solved a known long-term weakness.
Need Help?
If you’re unsure about which harness you have or want to order the upgrade kit, email us at sales@ogotoilet.com. We’ll get you what you need.