What You Need
-
OGO™ ORIGIN Replacement Power Button
-
¾ inch wrench (to remove the mounting nut)
-
Flathead screwdriver (optional for connector release)
Instructions
1. Disconnect Power
Unplug the toilet from the 12V DC source.
2. Access the Button
Reach behind the front panel from inside the unit. Locate the mounting nut and wire connector.
3. Disconnect Wires
Press the orange tab on the connector and pull the wires out. Use a flathead screwdriver if needed.

4. Remove the Button
Use a ¾ inch wrench to loosen and remove the nut. Push the button out from the front.
5. Install the New Button
Insert the new button into the panel. Tighten the nut by hand, then snug it with the wrench. Reconnect the wires in the same positions.
6. Reconnect Power and Test
Plug the unit back in. Press the button to confirm the cycle starts. Fill the bottle to verify the LED indicator turns on when full.
Wiring In The OGO™ ORIGIN Compost Toilet
The wiring inside the OGO™ ORIGIN has evolved as we've improved the design over the years. Every update is aimed at making the system simpler, more durable, and more effective for real-world compost toilet use.

Wire Diagram
If you are an existing customer and need a replacement button or any wiring component, contact us directly at sales@ogotoilet.com.
Our customer care team will make sure you get exactly what you need.
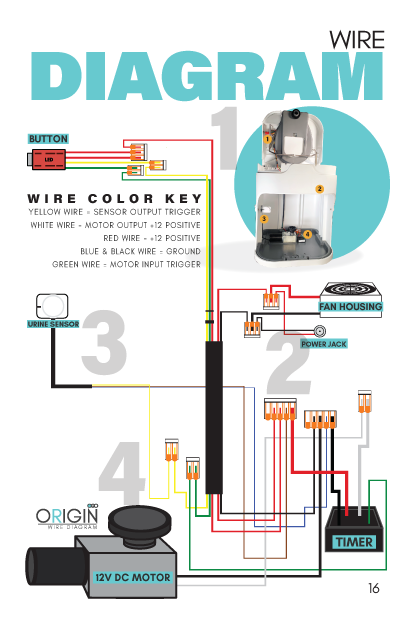
Wiring Colors:
-
Red = +12V
-
Black/Blue = Ground
-
Yellow = Sensor trigger
-
White = Motor +
-
Green = Motor trigger